Posts

Showing posts from July, 2022

ESP32-S3/CircuitPython to drive SSD1331 SPI color OLED

Image
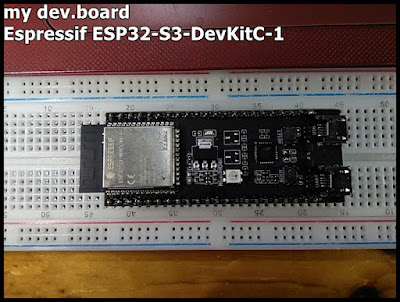
This exercise run on ESP32-S3-DevKitC-1 /CircuitPython 7.3.2, to drive 0.95 inch 96x64 SSD1331 SPI Color OLED . adafruit_ssd1331.mpy, adafruit_display_shapes and adafruit_display_text folders are needed, upload to CircuitPython device's /lib folder. If you don't know how to download and install Adafruit Library, read here . The original ssd1331_simpletest.py not work on ESP32-S3, here cpyS3_ssd1331_simpletest.py is my modified version work on ESP32-S3-DevKitC-1. """ Simple Test 0.95" 96x64 SSD1331 SPI Color OLED run on ESP32-S3-DevKitC-1/CircuitPython modified from ssd1331_simpletest.py example Connection: SSD1331 ESP32-S3-DevKitC-1 ----------------------------- GND GND VCC 3V3 SCL IO12 SDA IO11 RES IO4 DC IO5 CS IO6 """ # SPDX-FileCopyrightText: 2021 ladyada for Adafruit Industries # SPDX-License-Identifier: MIT """ This test will initialize the displ

0.95 inch 96x64 SSD1331 SPI Color OLED

Image
 My display module: 0.95 inch 96x64 SSD1331 SPI Color OLED: my exercise for 0.95 inch 96x64 SSD1331 SPI Color OLED: ~  ESP32-S3/CircuitPython to drive SSD1331 SPI color OLED ~  ESP32-C3(NodeMCU ESP-C3-32S-Kit) drive SSD1331 SPI Color OLED, in arduino-esp32 framework . ~  Raspberry Pi Pico/CircuitPython 8 to drive SSD1331 SPI color OLED . ~  Exercise of using bitmaptools.draw_polygon() added in CircuitPython 8.1.0

ESP32-S3-DevKitC-1/CircuitPython to drive NeoPixel, onboard and offboard.

Image
This exercise show how ESP32-S3-DevKitC-1 (running CircuitPython 7.3.2) to drive NeoPixel, onboard RGB and offboard 16 x WS2812 5050 RGB LED Square with Integrated Drivers. Please note that ESP32-S3-DevKitC-1 have two version, ver 1.0 and ver 1.1, The main difference lies in that the RGB LED is connected to different pins. On ver 1.0, my board, it's driven by GPIO48. On ver 1.1, driven by GPIO38. Adafruit CircuitPython NeoPixel library is needed. To install library, read last post " Download and install CircuitPython Library to CIRCUITPY drive's lib folder ". cpyS3_NEOPIXEL.py , drive onboard RGB. import time import neopixel import board def cycleNeopixel(wait): for r in range(255): pixel[0] = (r, 0, 0) time.sleep(wait) for r in range(255, 0, -1): pixel[0] = (r, 0, 0) time.sleep(wait) for g in range(255): pixel[0] = (0, g, 0) time.sleep(wait) for g in range(255, 0

Download and install CircuitPython Library to CIRCUITPY drive's lib folder

Image
The CircuitPython Library Bundle contains all current libraries available for CircuitPython. This video show steps to download and install CircuitPython Library to CIRCUITPY drive's lib folder. Visit CircuitPython Libraries page ,  download the appropriate bundle for your version of CircuitPython. Unzip the file, open the resulting folder and find the lib folder. Open the lib folder and find the library files you need to load. Create a lib folder on your CIRCUITPY drive. Copy the individual library files you need to the lib folder on your CIRCUITPY drive. More details are available here . Next: ~  ESP32-S3-DevKitC-1/CircuitPython to drive NeoPixel, onboard and offboard .

Flash CircuitPython on ESP32-S3-DevKitC-1 using esptool, run on Ubuntu MATE 22.04 LTS.

Image
Flash CircuitPython 7.3.2 on ESP32-S3-DevKitC-1 using esptool, run on Ubuntu MATE 22.04 LTS . -  Install esptool    (esptool is a serial utility to communicate & flash code to Espressif chips) - Download firmware Visit CircuitPython download page . Search "S3" and download firmware for "ESP32-S3-DevKitC-1-N8R8 by Espressif". Download firmware in .bin. - Flash firmware using esptool Connect USB to the port marked "UART". Erase flash: esptool.py --port /dev/ttyUSB0 erase_flash Flash firmware: esptool.py --chip esp32s3 --port <port> write_flash -z 0x0 <firmware.bin> To run it in CircuitPython REPL, connect to the port marked "USB". remark: If you cannot connect/detect ttyUSB0, check previous post  cp210x converter now disconnected from ttyUSB0 by 'brltty', on Ubuntu MATE 22.04 LTS . Next: -  Download and install CircuitPython Library to CIRCUITPY drive's lib folder Exercise of C

cp210x converter now disconnected from ttyUSB0 by 'brltty', on Ubuntu MATE 22.04 LTS.

Image
Recently, I install CircuitPython on ESP32-S3-DevKitC-1 on Ubuntu MATE 22.04 LTS/VirtualBox . But the CP2102N USB to UART Bridge Controller always attached and disconnected, like this: It's found that the interface 0 claimed by cp210x while 'brltty' sets config. BRLTTY is a background process (daemon) which provides access to the Linux/Unix console (when in text mode) for a blind person using a refreshable braille display. It drives the braille display, and provides complete screen review functionality. Some speech capability has also been incorporated. In my own case , I think brltty is not needed, so I remove it with command: sudo apt remove brltty It work for me, ttyUSB0 can be connected normally after brltty removed.

my dev.board - Espressif ESP32-S3-DevKitC-1

Image
The ESP32-S3-DevKitC-1 is an entry-level development board equipped with ESP32-S3-WROOM-1, ESP32-S3-WROOM-1U, or ESP32-S3-WROOM-2, a general-purpose Wi-Fi + Bluetooth® LE MCU module that integrates complete Wi-Fi and Bluetooth LE functions. Currenntly, there are two versions of ESP32-S3-DevKitC-1: The older version: ESP32-S3-DevKitC-1 The latest version: ESP32-S3-DevKitC-1 v1.1 Both versions of ESP32-S3-DevKitC-1 are available on the market. The main difference lies in that the RGB LED is connected to different pins. (ref:  https://docs.espressif.com/projects/esp-idf/en/latest/esp32s3/hw-reference/esp32s3/user-guide-devkitc-1.html#hardware-revision-details ) on v1.0 (the older version): RGB LED driven by GPIO48. on v1.1: RGB LED driven by GPIO38. My board is ESP32-S3-DevKitC-1 v1.0 with ESP32-S3-WROOM-1, N8R8 - 8MB Flash and 8MB PSRAM, onboard PCB antenna. Related: ~  Install esptool on Raspberry Pi OS and flash MicroPython firmware on NodeM

Install esptool on Ubuntu MATE, to flash ESP chips

Image
esptool is a serial utility to communicate & flash code to Espressif chips. We can install on Ubuntu MATE using pip3. Install pip3 if you haven't: sudo apt install python3-pip Install esptool using pip3: sudo pip3 install esptool To update esptool once available: sudo pip3 install esptool --upgrade Next: ~  Flash CircuitPython on ESP32-S3-DevKitC-1 using esptool, run on Ubuntu MATE 22.04 LTS

Drive SSD1327 I2C grayscale OLED with Nano RP2040 Connect (in Arduino framework), using "Adafruit SSD1327" library.

Image
The following video show installing "Adafruit SSD1327" library in Arduino IDE 1.8.19, run on Nano RP2040 Connect (in Arduino framework) to drive my no brand 1.5" 128x128 SSD1327 I2C grayscale OLED . The pins used for I2C on the Nano RP2040 Connect are the following: SDA - A4 SCL - A5 (ref: https://docs.arduino.cc/tutorials/nano-rp2040-connect/rp2040-01-technical-reference ) Check using i2c_scanner , the SSD1327 OLED's I2C address is 0x3C. Related: ~  Raspberry Pi Pico/CircuitPython display on SSD1327 grayscale OLED

1.5" 128x128 grayscale OLED with I2C SSD1327 driver

Image
It's a 1.5 inch 128x128 grayscale OLED with I2C SSD1327 driver. - Product page:  1.5inch OLED Module SKU:MC01503 Related: ~  Drive SSD1327 I2C grayscale OLED with Nano RP2040 Connect (in Arduino framework), using "Adafruit SSD1327" library . ~  Raspberry Pi Pico/CircuitPython display on SSD1327 grayscale OLED

I2C Scanner for Arduino Framework

Image
i2c_scanner is a simple sketch scans the I2C -bus for devices. If a device is found, it is reported to the Arduino serial monitor. How it run on Arduino Nano RP2040 Connect:

Install thonny Python IDE on Linux (Ubuntu MATE)

Image
To thonny Python IDE on Linux, simple enter the command in Terminal: sudo apt install thonny Here how it run on Ubuntu MATE 22.04 LTS

Upgrade Nano RP2040 Connect NINA-W102 module's firmware

Image
This post show how to upgrade my Nano RP2040 Connect NINA-W102 module's firmware using Arduino Cloud IoT and using Arduino IDE 1.8.19. On Ubuntu MATE. Upgrade Nano RP2040 Connect NINA-W102 module's firmware using Arduino Cloud IoT At first, I follow the steps in official guide to Upgrading Nano RP2040 Connect NINA Firmware . I followed the option Arduino Cloud IoT suggested as it's the quickest and easiest method. Before setup you device in Arduino Cloud IoT, you have to install Create Agent. Visit https://create.arduino.cc/getting-started/plugin/welcome , follow the steps. To install the downloaded in Linux, run with sudo in terminal. some like this: sudo ./ArduinoCreateAgent-1.2.6-linux-x64.run Navigating to create.arduino.cc/iot/devices . Here you will be prompted to sign in or sign up for an Arduino account for free. Then set up your Arduino device. The configuration wizard will guide in the steps. It includes updating the firmware.

Setup and post install Arduino IDE for Nano RP2040 Connect, on Ubuntu MATE.

Image
This video show steps to Setup and post install Arduino IDE for Nano RP2040 Connect, on Ubuntu MATE (over VirtualBox).  Install "Arduino Mbed OS Nano Boards by Arduino" in Board Manager.  But you have to locate and run post_install.sh after installed, this video show how. post_install.sh, listed here for reference. #!/usr/bin/env bash rp2040rules () { echo "" echo "# Raspberry Pi RP2040 bootloader mode UDEV rules" echo "" cat <<EOF SUBSYSTEMS=="usb", ATTRS{idVendor}=="2e8a", MODE:="0666" EOF } if [ "$EUID" -ne 0 ] then echo "Please run as root" exit fi rp2040rules > /etc/udev/rules.d/60-rp2040.rules # reload udev rules echo "Reload rules..." udevadm trigger udevadm control --reload-rules Next: ~ Upgrade Nano RP2040 Connect NINA-W102 module's firmware, using Arduino Cloud IoT and Arduino IDE 1.8.19 .

Install geany on Ubuntu MATE

Image
Geany is a lightweight programmer's text editor . To install geany on Ubuntu MATE, enter the command in Terminal: sudo apt install geany

my dev.board - Arduino Nano RP2040 Connect

Image
pinout: Related: ~ arduino.cc docs - Arduino Nano RP2040 Connect ~  Nano RP2040 Connect Cheat Sheet my related post: ~  Setup and post install Arduino IDE for Nano RP2040 Connect, on Ubuntu MATE ~  Arduino IDE on Raspberry Pi OS can't compile for RP2040 - Error loading Python lib libpython3.7m.so.1.0 ~  Install Raspberry Pi Pico/RP2040 to Arduino IDE 2, on Windows 11 Arduino Framework Exercise ~  Drive SSD1327 I2C grayscale OLED with Nano RP2040 Connect, using "Adafruit SSD1327" library . ~  Arduino Nano RP2040 Connect display on 1.14" 135x240 IPS ST778V SPI ~  Nano RP2040 Connect connect to WiFi network ~  Nano RP2040 Connect get time from Network Time Protocol (NTP) time server display on ST7789 SPI IPS

Install Arduino IDE 1.8.19 on Ubuntu MATE 22.04 LTS, and set permission.

Image
This video show steps to install Arduino IDE 1.8.19 on Ubuntu MATE 22.04 LTS, and set permission for USB. Visit https://www.arduino.cc/en/software to download Arduino IDE 1.18.19, Linux 64 bits. Extract the downloaded file and run install.sh in terminal: sudo ./install.sh Normally, it will fail to upload due to permission denied. To fix it, enter the commands: sudo usermod -a -G dialout <user> sudo chmod a+rw <port> The Ubuntu MATE is installed over VirtualBox in last post , the video also show how to forward USB to virtual machine by adding to USB Device Filters. related: ~  Setup and post install Arduino IDE for Nano RP2040 Connect, on Ubuntu MATE ~  Check if I belongs to dialout group

Install Ubuntu MATE 22.04 LTS on VirtualBox 6.1

Image
Visit https://ubuntu-mate.org/download/ to download 64-bit PCs/Macs 22.04 LTS. It's strongly recpmmended to install Guest Additions CD image, as shown in the video.

coxxect = Cross Connect

A long long time ago, I made a blog, android-er , to record my process in learning Android programming and share my knowledge. Then I build other blogs  arduino-er for Arduino,  helloraspberrypi for Raspberry Pi and Embedded things for anything else, and YouTube Channel for post my demo videos. Such a case make me mess. And after years, various devices can cross connected together, as show in my exercises: may be Raspberry Pi work with Arduino link to ESP32 via BLE... So I want to make a complete new blogspot/YouTube channel to connect it all together. That's it  coXXect , and my YouTube channel . Please follow me in Twitter also, thks. coXXect = cross Connect

Hello World

Hello World ~ from coXXect