Posts

Showing posts from February, 2023

WCHlink Debugger for ARM/RISC-V, by WeAct Studio.

Image
WCHlink Debugger for ARM/RISC-V, by WeAct Studio. ~ Steps to download firmware on CH582F (RISC-V) using WeAct WCHlink Debugger Related link: ~  gitee Wchlink (https://gitee.com/WeAct-TC/wchlink)

CH582F (RISC-V) BLE5.3 Core Board, by WeAct Studio.

Image
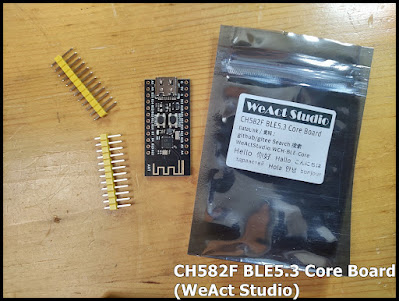
Its' CH582F BLE5.3 Core Board, by WeAct Studio. Related Link: ~ Product Page ~ Github WeActStudio.WCH-BLE-Core Remark in my start-up using CH582F BLE5.3 Core Board + WCHlink Debugger for ARM/RISC-V , by WeAct Studio. (on Windows 10) Install MounRiver & WCHISPTool (and driver) Download and install MounRiver Studio to build first Hello World. Firstly, I build a Hello World using MounRiver Studio and try to download to CH582F using ISP (In-System Programmer). At most beginning, I download and install  WCHISPTool_Setup.exe from Github , it's version 3.3. Suppose it will install WCHlink USB driver also. To put the CH582F in ISP mode, press and hold the BOOT button and connect to USB port. In my case, CH582F cannot be recognized. Then I download and re-install from WCH page (http://www.wch-ic.com/downloads/WCHISPTool_Setup_exe.html) . It's named  WCHISPStudio 3.4 now. Then it can be recognized, and everything get smooth. Whe

ESP32/2.13" 250x122 3-color Epaper Module using Adafruit_EPD (arduino-esp32)

Image
Last post show steps to display on 2.13" 250x122 3-color E-paper (SSD1680) with ESP32-DevKitC V4 using ZinggJM/GxEPD2 Library (in arduino-esp32 framework) . This video show using another library  Adafruit_EPD . It can be installed using Arduino IDE Library Manager. Connection Same as in previous post: e-paper ESP32 GPIO ------------------ 1 BUSY GP15 2 RES GP2 3 D/C GP0 4 CS GP5 5 SCL GP18 6 SDA GP23 7 GND GND 8 VCC 3V3 Library Search and install Arduino_EPD in Arduino IDE Library Manager. Example Open Open Example Adafruit EPD > EPDTest Edit to uncomment the line: //Uncomment the following line if you are using 2.13" EPD with SSD1680 Adafruit_SSD1680 display(250, 122, EPD_DC, EPD_RESET, EPD_CS, SRAM_CS, EPD_BUSY); and comment all others. Run it. Next: ~  Min. exercises to display on 2.13" 250x122 3-color E-paper with ESP32-S3, using GxEPD2 vs Adafruit_EPD

ESP32/2.13" 250x122 3-color Epaper Module using ZinggJM/GxEPD2

Image
Display on 2.13" 250x122 3-color E-paper (SSD1680) with ESP32-DevKitC V4 using ZinggJM/GxEPD2 Library (in arduino-esp32 framework). Visit WeAct Studio 2.13/2.9 Inch Epaper Module EPD in GitHub (https://github.com/WeActStudio/WeActStudio.EpaperModule) . It provide info and example code for WeAct Epaper Modules. We are going to use EpaperModuleTest_Arduino_ESP32 Example later, it use GxEPD2 library to control e-paper. Visit Github ZinggJM/GxEPD2 (https://github.com/ZinggJM/GxEPD2) . To download library in ZIP: Click on Code > Download ZIP Open Arduino IDE, to install download library: Sketch > Include Library > Add ZIP Library Select the downloaded ZIP file Connection To run the examples below, we follow the connection in WeAct Example: e-paper ESP32 GPIO ------------------ 1 BUSY GP15 2 RES GP2 3 D/C GP0 4 CS GP5 5 SCL GP18 6 SDA GP23 7 GND GND 8 VCC 3V3 Try WeAct Example Then copy  WeAct Example, EpaperModuleTest_Arduino_ESP32

ESP32-DevKitC V4 with ESP32-WROVER-E

Image
My dev.board: ESP32-DevKitC V4 with ESP32-WROVER-E ~  ESP32-DevKitC V4 Getting Started Guide pinout: Examples: ~  ESP32/2.13" 250x122 3-color Epaper Module using ZinggJM/GxEPD2 ~  ESP32/2.13" 250x122 3-color Epaper Module using Adafruit_EPD ~  Display on 1.28" 240x240 Round IPS LCD (with GC9A01 SPI driver) with ESP32 (arduino-esp32) using GFX Library for Arduino (Arduino_GFX)

2.13" 250x122 Epaper Module (Black-Red-White)

Image
2.13" 250x122 Epaper Module (Black-Red-White), by WeAct. info: ~  https://github.com/WeActStudio/WeActStudio.EpaperModule Examples In Arduino framework: ~  ESP32/2.13" 250x122 3-color Epaper Module using ZinggJM/GxEPD2 ~  ESP32/2.13" 250x122 3-color Epaper Module using Adafruit_EPD In CircuitPython: ~  2.13" 250x122 e-paper (ssd1680) displayed on Raspberry Pi pico/CircuitPython

1.54" 200x200 e-Paper with SSD1681 SPI driver

Image
It's 1.54" 200x200 e-Paper with SSD1681 SPI driver, by ZhongJing Yuan Electron. Exercise: ~  Display on 1.54" 200x200 e-Paper (SSD1681) with Raspberry Pi Pico using GxEPD2 library, in Arduino framework . ~  Generate QRCode with Raspberry Pi Pico (arduino framework), display on 1.54" 200x200 B&W e-Paper (SSD1681)

Install Rust on Linux Mint 21.1 (Over VirtualBox)

Image
This video show steps to install Rust (1.67.1) on Linux Mint 21.1 (over VirtualBox). To install Rust on Linux (or macOS), enter the command in Terminal: $ curl --proto '=https' --tlsv1.3 https://sh.rustup.rs -sSf | sh The command downloads a script and starts the installation of the rustup tool, which installs the latest stable version of Rust. ref: ~  https://doc.rust-lang.org/book/ch01-01-installation.html After Rust installed, you can follow the steps in the video to try your first Hello World using rustc, or using Cargo. rustc is fine for simple programs. But as your project grows, you’ll want to manage all the options and make it easy to share your code. Cargo will help you write real-world Rust programs. Cargo is Rust’s build system and package manager. Most Rustaceans use this tool to manage their Rust projects because Cargo handles a lot of tasks for you, such as building your code, downloading the libraries your code depends o

Raspberry Pi Pico W/MicroPython act as socket client, connect to HC-25 WiFi Module.

Image
It's my MicroPython exercise run on Raspberry Pi Pico W , to act as WiFi station/socket client connect to socket server on HC-25 WiFi Module . Remark: In my trial, it's unstable to connect to HC-25 when I stop Raspberry Pi Pico W/MicroPython and run again. May be need power OFF-ON, some delay, or handle something, I have no any idea right now! mpyPicoW_SocketClient.py """ Raspberry Pi Pico W/MicroPython exercise: A simple socket client connect to HC-25 ref: Raspberry Pi Pico W official book: Connecting to the Internet with Raspberry Pi Pico W """ import sys import os import time import network import socket ssid = 'myHC-25' password = 'password' serverAddr = "192.168.4.1" serverPort = 8080 # To know WLAN status # It's helpflul in learning and debugging def understandWLAN(wwlan): print("------------------------------") print("Information to understand wlan") print(wwla