Posts

Showing posts with the label code.arduino

WebServer on ESP32-C5-WIFI6-KIT-N16R8, to control onboard RGB LED (Arduino Framework)

Image
Exercises (Arduino Framework) run on Waveshare ESP32-C5-WIFI6-KIT-N16R8 , act as WiFi Access Point, and setup simple WebServer to control onboard RGB LED. ESP32C5_WiFi_AP_WebServer , act as Access Point and setup a simple WebServer. /* Exercise run on Waveshare ESP32-C5-WIFI6-KIT-N16R8 Setup WiFi AP, and a simple WebServer. details: https://coxxect.blogspot.com/2026/03/webserver-on-esp32-c5-wifi6-kit-n16r8.html Ref: Arduino ESP32 Wi-Fi API https://docs.espressif.com/projects/arduino-esp32/en/latest/api/wifi.html Github: espressif/arduino-esp32/libraries/WebServer/ https://github.com/espressif/arduino-esp32/tree/master/libraries/WebServer */ #include <WiFi.h> #include <WebServer.h> // Built-in lightweight HTTP server const char* ssid = "ESP32-C5_AP"; const char* password = "12345678"; // Create a web server on port 80 WebServer server(80); void handleRoot() { server.send(200, "text/html", "<h1>Hello from ESP32-C5 W...

Raspberry Pi Pico 2 W display on two 1.9" 170*320 ST7789 SPI LCD, using Arduino_GFX_Library, using separated SPI.

Image
Raspberry Pi Pico 2 W display on two 1.9" 170*320 ST7789 SPI LCD, using Arduino_GFX_Library, using separated SPI. In previous exercise, I used a Raspberry Pi Pico 2 W to drive two LCDs: a 2.4-inch and a 2.0-inch 240×320 ST7789 SPI IPS . Both displays shared a common SPI bus without any problems. However, when I replaced them with two 1.9-inch 170×320 ST7789 SPI LCDs , the setup did not work. Using the same code and connections, only the second LCD would turn on. To solve this, I separated the SPI connections for the two displays: the first one (on the left) is connected via Arduino_RPiPicoSPI, and the second one (on the right) is connected via Arduino_SWSPI. Updated connection: Raspberry Pi Pico 2 W      GP28| LCD2_RST -----------------+      GND | |      GP27| LCD2_DC ----------------+ |      GP26| LCD2_CS --------------+ | |      Run | ...

LVGL v9 exercise run on Raspberry Pi Pico 2 + Waveshare 1.9inch Touch LCD (170x320 ST7789V2 SPI LCD and CST816 I2C capacitive touch).

Image
LVGL v9 exercise run on Raspberry Pi Pico 2 + Waveshare 1.9inch Touch LCD (170x320 ST7789V2 SPI LCD and CST816 I2C capacitive touch) Basic setup and connection, refer to last exercise:  Raspberry Pi Pico 2 + Waveshare 1.9inch Touch LCD, using Arduino_GFX_Library in Arduino Framework . To add LVGL function: - Install LVGL library in Arduino IDE Library Manager. - Go to lvgl library directory.   Copy lv_conf_template.h as lv_conf.h into the Arduino Libraries directory. - To enable the content of the file:     change the first #if 0 to #if 1 /* clang-format off */ #if 1 //0 /* Set this to "1" to enable content */ Exercise Code: rpPico2_ST7789_CST816_lvgl_button.ino , Create a button to control onboard LED. /* LVGL v9 exercise run on Raspberry Pi Pico 2 + Waveshare 1.9inch Touch LCD (170x320 ST7789V2 SPI LCD and CST816 I2C capacitive touch). Create a button to control onboard LED. https://coxxect.blogspot.com/2025/12/lvgl-v9-exer...

Raspberry Pi Pico 2 + Waveshare 1.9inch Touch LCD, using Arduino_GFX_Library in Arduino Framework.

Image
Raspberry Pi Pico 2 +  Waveshare 1.9inch Touch LCD (170x320 ST7789V2 SPI LCD and CST816 I2C capacitive touch) in Arduino Framework, interface with ST7789 using Arduino_GFX_Library (GFX Library for Arduino by Moon On Our Nation), and reading register from CST816 via I2C. Connection: Code: rpPico2_Arduino_GFX.ino , setup for Arduino_GFX_Library, color test. /* Raspberry Pi Pico 2 + Waveshare 1.9inch Touch LCD, 170x320 ST7789V2 SPI LCD and CST816 I2C capacitive touch. Using Arduino_GFX_Library (GFX Library for Arduino by Moon On Our Nation) Details: https://coxxect.blogspot.com/2025/12/raspberry-pi-pico-2-waveshare-19inch.html Using board of Raspberry Pi Pico/RP2040/RP2350 by Earle F. Philhower III in Boards Manager. https://github.com/earlephilhower/arduino-pico Install Earle Philhower Raspberry Pi Pico Arduino core in Arduino IDE https://coxxect.blogspot.com/2023/08/install-earle-philhower-raspberry-pi.html */ /*********************...

Control onboard RGB LED of Waveshare ESP32-H2-Zero and ESP32-H2-DevKitM-1-N4, in Arduino framework.

Image
Following code control the onboard RGB LED of Waveshare ESP32-H2-Zero and ESP32-H2-DevKitM-1-N4 , in Arduino framework. H2_BlinkRGB.ino /* H2_BlinkRGB */ void setup() { // No need to initialize the RGB LED } // the loop function runs over and over again forever void loop() { // * notice the color order rgbLedWrite(RGB_BUILTIN, RGB_BRIGHTNESS, 0, 0); // Red delay(1000); rgbLedWrite(RGB_BUILTIN, 0, RGB_BRIGHTNESS, 0); // Green delay(1000); rgbLedWrite(RGB_BUILTIN, 0, 0, RGB_BRIGHTNESS); // Blue delay(1000); rgbLedWrite(RGB_BUILTIN, 0, 0, 0); // Off / black delay(1000); int fade_speed = 10; for(int i=0; i<=255; i++){ rgbLedWriteOrdered(RGB_BUILTIN, LED_COLOR_ORDER_RGB, i, 0, 0); // Red delay(fade_speed); } for(int i=255; i>=0; i--){ rgbLedWriteOrdered(RGB_BUILTIN, LED_COLOR_ORDER_RGB, i, 0, 0); // Red delay(fade_speed); } for(int i=0; i<=255; i++){ rgbLedWriteOrdered(RGB_BUILTIN, LED_COLOR_ORDER_RGB, 0, i,...

Control Nologo Nano 33 BLE nRF52840 on-board LEDs

Image
Arduino code to control Nologo Nano 33 BLE nRF52840 on-board LEDs /* Exercise run on Nano 33 BLE nRF52840 to change LEDs. */ // the setup function runs once when you press reset or power the board void setup() { delay(1000); Serial.begin(9600); delay(500); Serial.print("LED_BUILTIN: "); Serial.println(LED_BUILTIN); Serial.print("LEDR: "); Serial.println(LEDR); Serial.print("LEDG: "); Serial.println(LEDG); Serial.print("LEDB: "); Serial.println(LEDB); // set LED pins to output mode pinMode(LEDR, OUTPUT); pinMode(LEDG, OUTPUT); pinMode(LEDB, OUTPUT); pinMode(LED_BUILTIN, OUTPUT); //turn off all LED digitalWrite(LED_BUILTIN, LOW); digitalWrite(LEDR, HIGH); digitalWrite(LEDG, HIGH); digitalWrite(LEDB, HIGH); } void changeRGB(){ digitalWrite(LEDR, HIGH); digitalWrite(LEDG, HIGH); digitalWrite(LEDB, HIGH); delay(1000); digitalWrite(LEDR, LOW); //LEDR On delay(500); digit...

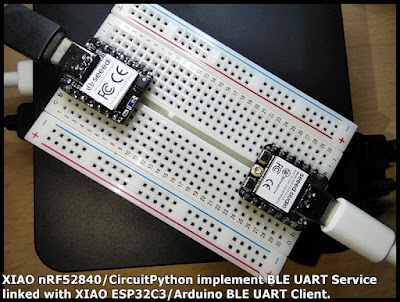
XIAO nRF52840/CircuitPython implement BLE UART Service, linked with XIAO ESP32C3/Arduino BLE UART Client.

Image
  The BLE GATT Nordic UART Service (NUS) is a custom service that receives and writes data and serves as a bridge to the UART interface. ref: https://developer.nordicsemi.com/nRF_Connect_SDK/doc/2.3.0/nrf/libraries/bluetooth_services/services/nus.html In this exercise, XIAO nRF52840 Sense running CircuitPython, implement BLE UART Service. cpynRF_ble.py """ Circuitpython BLE exercise Run on XIAO nRF52840 Sense/CircuitPython 8.1.0-beta.1 Provide an echo service over BLE UART. Act as BLE UART server, receive from BLE UART and echo back ref: https://learn.adafruit.com/circuitpython-ble-libraries-on-any-computer/ble-uart-example """ import os, sys import time import board, busio from adafruit_ble import BLERadio from adafruit_ble.advertising.standard import ProvideServicesAdvertisement from adafruit_ble.services.nordic import UARTService #------------------------ print("========================================") print(...

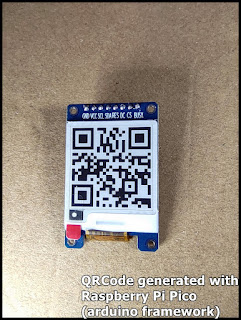
Generate QRCode with Raspberry Pi Pico (arduino framework), display on 1.54" 200x200 B&W e-Paper (SSD1681)

Image
Last post show how to  display on 1.54" 200x200 e-Paper (SSD1681) with Raspberry Pi Pico using GxEPD2 library, in Arduino framework . It's another exercise to generate QRCode with Raspberry Pi Pico, and display on 1.54" 200x200 B&W e-Paper (SSD1681) GxEPD2 and QRCode libraries are needed, install them in Arduino IDE's Library Manager. Code Pico_GxEPD2_SSD1681_qrcode.ino /* *Exercise run on Raspberry Pi Pico/RP2040 *display QRCode on 1.54" 200x200 e-Paper with SSD1681 SPI driver, *using ZinggJM/GxEPD2 and qrcode lib * *qrcode: *https://github.com/ricmoo/qrcode/ */ #include <GxEPD2_BW.h> #include <qrcode.h> #define EPD_CS 17 #define EPD_DC 21 #define SRAM_CS -1 #define EPD_RESET 20 #define EPD_BUSY 22 GxEPD2_BW<GxEPD2_154_GDEY0154D67, GxEPD2_154_GDEY0154D67::HEIGHT> display( GxEPD2_154_GDEY0154D67(EPD_CS, EPD_DC, EPD_RESET, EPD_BUSY)); const int DISP_WIDTH = display.width(); const int D...