Posts

Showing posts with the label dev. tools

Install Arduino IDE 2.3.8 and ESP32 Arduino Core on Linux Mint 22.3 (Over VirtualBox 7.2.8)

Image
To install the Arduino IDE 2.3.8 on Linux Mint using the AppImage format, tested on Linux Mint 22.3 Xfce over VirtualBox on Windows 11. Step 1: Download the AppImage - Go to the official Arduino Software page . - Look for Arduino IDE 2.3.8 (or the latest version). - Click on the "Linux AppImage 64 bits" link to download the file. - You can move the downloaded file to other folder you want. Step 2: Grant Execution Permission By default, Linux treats downloaded AppImages as non-executable files for security. You must enable execution rights. Option A: Using the Terminal (Recommended) Open your terminal and navigate to the folder contain the downloaded file: chmod +x arduino-ide_2.3.8_Linux_64bit.AppImage Option B: Using the GUI - Right-click the downloaded .AppImage file. - Select Properties. - Go to the Permissions tab. - Check the box that says "Allow executing file as program". Step 3: Configure Serial Port Permissions (dialout) In Linux, your user accou...

Resize and convert jpg/mp4 to bmp/gif using FFmpeg

Image
To resize and convert jpg to bmp/mp4 to gif using FFmpeg. Download and Install FFmpeg on Windows 11 1. Download FFmpeg • Go to the official FFmpeg download page ( https://www.ffmpeg.org/download.html ). • Get packages & executable files. • Choose a trusted Windows build provider (e.g., gyan.dev). • Download the archive ffmpeg-git-essentials.7z (this version is lightweight and sufficient for most users). • Extract the archive to a folder, for example:      C:\ffmpeg\ 2. Set Environment Variable PATH 1. In Windows search, type “Environment Variables” and open Edit the system environment variables. 2. In the “System Properties” window, click Environment Variables…. 3. In the User variables section, find Path → click Edit. 4. Add a new entry:      C:\ffmpeg\bin 5. Save and close. 3. Test Installation Open Command Prompt (CMD) or PowerShell, then type: ffmpeg -version R...

Create Python virtual environment in Windows 11, and install PyQt6 failed and succeeded.

Image
This video show steps to create Python virtual environment in Windows 11, also set in Thonny using the Python executable in the virtual environment, then install PyQt6 in the new created virtual environment. To create Python virtual environment in Windows 11 , enter the command in Command prompt, where envTry is the name of the virtual environment to be created. python -m venv envTry To activate the virtual environment, run "activate" under the "Scripts" folder in the new virtual environment. To use the Python in the virtual environment : > Run > Configure Interpreter... > Select Local Python 3 in the interpreter option. > Browser to select the Python executable in the virtual environment. To install PyQt6 using pip, simple enter the command : pip install PyQt6 If fail with error: Microsoft Visual C++ 14.0 or greater is required. Get it with "Microsoft C++ Build Tools". Visit the link ( https:/...

Install Python 3.13 on Windows 11 and setup in Thonny Python IDE

Image
To install Python 3.13 on Windows:- Visit https://www.python.org/ , to download Python 3.13.0 for Windows. In my case run the downloaded exe file as administrator , otherwise fail with error of "The installation is forbidden by system policy. Contact your system administration" . Make sure to check "Add python.exe to PATH" in the installation dialog. To setup Thonny Python IDE to use the new Python 3.13.0:- I have to manually add the Python executable in Thonny options. Check the video: A simple Python code to get info of the running Python and platform. import os, sys, platform print(sys.implementation.name, ":") print(sys.version) print(sys.platform) print("=============================================") print("Running on: ", platform.platform()) print("=============================================")

Install Pillow(PIL) for Python in Windows 11/Thonny

Image
To install Pillow (or PIL) in Windows 11, simple enter the command in Terminal: pip install Pillow To install in Thonny, > Click on Tools > Manager packages... > Search "pillow" and install it. Remark: ~ Both the Python Slideshow code and the images in the video are generated by Copilot .

Install arduino_core_ch32 (1.0.3) on Arduino IDE 2+ to develop CH32V003 RISC-V MCU in Arduino Framework

Image
With openwch/arduino_core_ch32 , now we can develop  CH32 RISC-V MCU in Arduino IDE 2.0+/Windows 11. This video show steps to install arduino_core_ch32 in Arduino IDE 2 (fail to install version 1.0.4, then success in version 1.0.3). Then program  Muse Lab nanoCH32V003 (32-bit RISC-V development board) , and upload using  Muse Lab WCH-LinkE (WCH-Link Emulation Debugger Module) . Install arduino_core_ch32 in Arduino IDE 2 Add the following link in the "Additional Boards Managers URLs" field: https://github.com/openwch/board_manager_files/raw/main/package_ch32v_index.json Then search and install CH32 MCU EVT Boards by WCH. Currently, 1.0.4 is the most updated version, but fail: Downloading packages WCH:riscv-none-embed-gcc@8.2.0 WCH:openocd@1.0.0 WCH:beforeinstall@1.0.0 WCH:ch32v@1.0.4 Installing WCH:riscv-none-embed-gcc@8.2.0 Configuring tool. WCH:riscv-none-embed-gcc@8.2.0 installed Installing WCH:openocd@1.0.0 Configuring tool. ...

Install CircuitPython firmware on YD-ESP32-S3-EYE using esptool

Image
Install CircuitPython 8.2.8 firmware on YD-ESP32-S3-EYE by VCC-GND Studio using esptool, run on Linux Mint 21.2, over Windows 11/VirtualBox. Power up in BOOTLOADER mode: - Press and hold BOOT button, connect USB. Visit CircuitPython Download Page , search and download for ESP32-S3-EYE. Download .BIN of CircuitPython 8. Check CHIP/FLASH ID: esptool.py --chip auto --port <PORT> chip_id esptool.py --chip auto --port <PORT> flash_id Erase Flash:: esptool.py --chip esp32s3 --port <PORT> erase_flash Flash Firmware in .BIN: esptool.py --chip esp32s3 --port <PORT> --baud 460800 write_flash -z 0x0 <.BIN> Disconnect and connect USB again. It will run in CircuitPython. Exercises of CircuitPython run on YD-ESP32-S3-EYE: ~  YD-ESP32-S3-EYE/CircuitPython 8, control LCD and Camera .

Flash CircuitPython 9 (Alpha 5) on ESP32-C6, and control on-board RGB LED (NeoPixel).

Image
Flash CircuitPython 9.0.0-alpha.5 on YD-ESP32-C6-N16 , and control on-board RGB LED (NeoPixel). Run on Windows 11. esptool is needed to flash firmware on ESP-C6, read  Install esptool on Windows 11 . Steps to flash CircuitPython firmware on ESP32-C6: Visit https://circuitpython.org/downloads , search boards of ESP32-C6. There are no 16MB Flash version, so I try "ESP32-C6-DevKitC-1-N8". Download .bin of CircuitPython 9.0.0-alpha.5 now. Connect to USB connector marked "COM". Erase Flash with command: esptool --chip esp32c6 --port <COM> erase_flash Write Binary Data to Flash with command: esptool --chip esp32c6 --port <COM> write_flash 0x0 <.bin> Reconect USB to connector marked "USB". Open Thonny Python IDE. In Thonny: > Run > Configure interpreter... Select interpreter of "CircuitPython (generic)" and Port, then OK. Prepare lib for neopixel: Visit https://circuitpython.org/libr...

Install Espressif IDF Extension in VS Code to program ESP32-C3 Run on Linux Mint 21.2 (over Windows 11/VirtualBox)

Image
This video show steps to install Espressif IDF Extension in VS Code to program Espressif ESP32-C3-DevKitM-1 . Here VS Code run on Linux Mint 21.2 (over Windows 11/VirtualBox) . Basically, it follow the steps in  ESP-IDF Visual Studio Code Extension Installation Guide to - Install ESP-IDF Extension to VS Code. - Install Prerequisites for Linux . - Configure ESP-IDF extension. - Add 60-openocd.rules for permisssion delegation in USB to added in /etc/udev/rules.d/. Then follow Basic use of the extension to: - Create project of Blink example. - Grant permission to user to access USB port. - finally flash on ESP32-C3-DevKitM-1. Fix IntelliSense error of: identifier "CONFIG_BLINK_PERIOD" is undefined identifier "portTICK_PERIOD_MS" is undefined in VS Code/ESP-IDF Blink Example. With auto-generated code with default setting, it can be built, flash and run on ESP32-C3 device without error. Is it OK, ...NOT. ...

Install Rust-embedded on Micro:bit, run on Linux Mint 21.1.

Image
Install Rust-embedded on Micro:bit, run on Linux Mint 21.1 (over Windows 11/VirtualBox). This post shows how I start in rust-embedded on my micro:bit . Basically, this post follow the on-line book Discovery (micro:bit version) to introduce you to micro:bit and Rust-embedded. Setting up a development environment:- Install rustc & Cargo: Install rustup by following the instructions at https://rustup.rs $ curl --proto '=https' --tlsv1.2 -sSf https://sh.rustup.rs | sh Install cargo-binutils: $ rustup component add llvm-tools-preview $ cargo install cargo-binutils --vers 0.3.3 $ cargo size --version Install prerequisites for cargo-embed: $ sudo apt install -y pkg-config libusb-1.0-0-dev libftdi1-dev libudev-dev Install cargo-embed: $ cargo install cargo-embed --vers 0.11.0 but fail: failed to select a version for requirement 'cargo_toml = "^0.9.0"'... Then I install the latest 0.18.0 instead of 0.11.0. The ...

Flash CircuitPython firmware to ESP32-S3/C3 using esptool on Windows 11

Image
This video show steps to flash CircuitPython 8.0.5 to  Espressif ESP32-S3-DevKitC-1 , using esptool on Windows 11. Software preparation for Windows 11: - Install Python (and pip) - Install esptool - To recognize ESP32-S3-DevKitC-1 UART port, install CP210x USB driver Download CircuitPython firmware: - visit https://circuitpython.org/downloads - search ESP32-S3-DevKitC-1-N8R8, DOWNLOAD .BIN NOW To flash firmware to ESP32-S3-DevKitC-1-N8R8: - connect USB to the port marked "UART" To erase flash: esptool.py --chip esp32s3 --port <COM PORT> erase_flash To flash firmware to ESP32-S3: esptool.py --chip esp32s3 --port <COM PORT> write_flash -z 0x0 <firmware.bin> Optionally, you can check the chip ID and flash: esptool.py --chip auto --port <COM PORT> chip_id esptool.py --chip auto --port <COM PORT> flash_id Remake: ~ or using esptool instead of esptool.py. To flash firmware to Seeed Studio XIAO ESP32C3 : Download C...

Install esptool on Windows 11

Image
esptool is a Python-based, open-source, platform-independent utility to communicate with the ROM bootloader in Espressif chips; such ESP32, ESP32-C3, ESP32-S2, ESP32-S3... To install esptool, Python and pip is needed, read Install Python 3 and Thonny IDE 4 on Windows 11 . To install esptool: pip install esptool Once esptool is installed, you can update it with: pip install esptool --upgrade related: ~  Flash CircuitPython firmware to ESP32-S3 using esptool on Windows 11 ~  Flash CircuitPython 9 (Alpha 5) on ESP32-C6, and control on-board RGB LED (NeoPixel) . ~  Flash ESP-AT firmware to XIAO ESP32C3

Program CH32V003 with WCH-LinkE using MounRiver Studio on Windows 11

Image
This video show steps to install MounRiver Studio on Windows 11, include USB driver. Create and build project in MounRiver Studio. And download program to nanoCH32V003 with WCH-LinkE . Connection between nanoCH32V003 and WCH-LinkE CH32V003      WCH-LinkE --------------------- 3V3      3V3 DIO      SWDIO GND      GND Download, install and run MounStudio for Windows http://www.mounriver.com/download . It will update USB driver automatically. WCH-LinkE can be used to program RISV-V and ARM. To program CH32V003, it has to be set to WCH-LinkRV mode. To query and set Target Mode between WCH-LinkRV and WCH-DAPLink: Click on Download button on top menu bar > Configuration, follow the steps in the video. - In WCH-LinkRV mode (for RISC-V)   BLUE LED is off - In WCH-DAPLink mode (for ARM)   BLUE LED is on If it's error of: Read-Protect currently enabled...

Muse Lab WCH-LinkE

Image
It,s Muse Lab version of WCH-LinkE . related: ~  Program CH32V003 with WCH-LinkE using MounRiver Studio on Windows 11 ~  CH32V003 UART example (also show that WCH-LinkE can be used as USB to TTL serial adapter) ~  Install Core library for CH32duino (1.0.3) on Arduino IDE 2 to develop CH32 RISC-V MCU in Arduino Framework

Install Python 3 and Thonny IDE 4 on Windows 11

Image
To install Python (currently 3.11.3) on Windows 11 - Visit https://www.python.org/downloads/ , download the latest version for Windows. - In the Setup dialog, enable Add python.exe to PATH, and Install Now. Thonny Python IDE Visit https://thonny.org/ Download and run the Windows installer (thonny-4.0.2.exe).

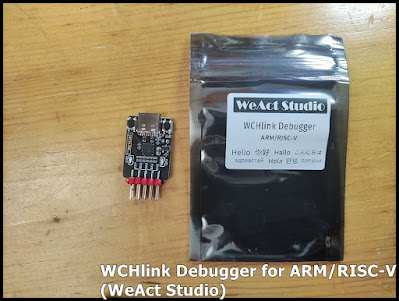
WCHlink Debugger for ARM/RISC-V, by WeAct Studio.

Image
WCHlink Debugger for ARM/RISC-V, by WeAct Studio. ~ Steps to download firmware on CH582F (RISC-V) using WeAct WCHlink Debugger Related link: ~  gitee Wchlink (https://gitee.com/WeAct-TC/wchlink)

Install Rust on Linux Mint 21.1 (Over VirtualBox)

Image
This video show steps to install Rust (1.67.1) on Linux Mint 21.1 (over VirtualBox). To install Rust on Linux (or macOS), enter the command in Terminal: $ curl --proto '=https' --tlsv1.3 https://sh.rustup.rs -sSf | sh The command downloads a script and starts the installation of the rustup tool, which installs the latest stable version of Rust. ref: ~  https://doc.rust-lang.org/book/ch01-01-installation.html After Rust installed, you can follow the steps in the video to try your first Hello World using rustc, or using Cargo. rustc is fine for simple programs. But as your project grows, you’ll want to manage all the options and make it easy to share your code. Cargo will help you write real-world Rust programs. Cargo is Rust’s build system and package manager. Most Rustaceans use this tool to manage their Rust projects because Cargo handles a lot of tasks for you, such as building your code, downloading the libraries your code depends ...

Install Thonny 4.0.1 on Linux Mint 21

Image
Currently, the Thonny available to be installed with apt is ver 3.3.14, not the most update 4.0.1. To install Thonny 4.0.1 Visit Thonny page: https://thonny.org/ For Linux, download "thonny-4.0.1.bash", and make it runnable as program. Run in Terminal $ ./thonny-4.0.1.bash

Install ESP32 Arduino Core (arduino-esp32) on Arduino IDE for the ESP32, ESP32-S2, ESP32-S3 and ESP32-C3

Image
To development ESP32 Series using Arduino Framework, Arduino Core (arduino-esp32) can be installed in Arduino IDE. The easiest way to install arduino-esp32 is using Arduino IDE. This vieo show the steps and tested on  ESP32-C3-DevKitM-1 . Click on Arduino IDE MENU > File > Preferences Enter the Stable release link or Development release link into the Additional Board Manager URLs box. Stable release link: https://raw.githubusercontent.com/espressif/arduino-esp32/gh-pages/package_esp32_index.json Development release link: https://raw.githubusercontent.com/espressif/arduino-esp32/gh-pages/package_esp32_dev_index.json Then, open Boards Manager, Search and install esp32 by Espressif Systems. After then boards of ESP32/S2/S3/C3 are available in boards selection. ESP32C3_info.ino , read ESP32 info. #include <Esp.h> void setup() { delay(500); Serial.begin(115200); delay(500); Serial.println("\n\n==================...

Install esptool on Ubuntu MATE, to flash ESP chips

Image
esptool is a serial utility to communicate & flash code to Espressif chips. We can install on Ubuntu MATE using pip3. Install pip3 if you haven't: sudo apt install python3-pip Install esptool using pip3: sudo pip3 install esptool To update esptool once available: sudo pip3 install esptool --upgrade Next: ~  Flash CircuitPython on ESP32-S3-DevKitC-1 using esptool, run on Ubuntu MATE 22.04 LTS