Posts

Raspberry Pi Pico W/MicroPython x 0.96" 80x160 ST7735 SPI IPS

Image
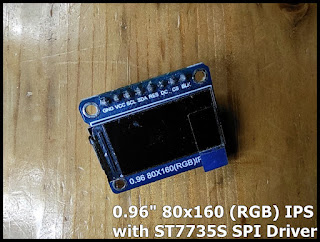
This post show how to display on  0.96" 80x160 ST7735 SPI IPS , with  Raspberry Pi Pico W /MicroPython, using  boochow/MicroPython-ST7735 library . The original boochow/MicroPython-ST7735 target 128x160 ST7735 TFT LCD driver for MicroPython. This post show steps to install the library, and modify it to fix screen size, offset and color. Please note that the modification base on my own guessing and trying, not any official suggested approach. Connection: ST7735 Raspberry Pi Pico W --------------------------- BLK 3V3 CS GP15 DC GP14 RES GP13 SDA GP11 SCL GP10 VCC 3V3 GND GND Prepare library: Visit: https://github.com/boochow/MicroPython-ST7735 Copy and edit ST7735.py, save to to MicroPython device, name it myST7735.py. ... ScreenSize = ( 80, 160 ) ... def setStart(self, colstart, rowstart): self._offset[0] = colstart self._offset[1] = rowstart def initr( self ) : '''Initialize a red t...

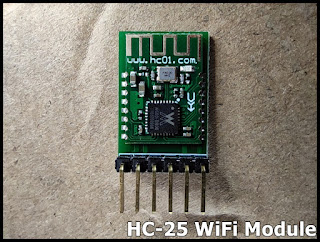
Xiao ESP32C3 (in arduino-esp32 framework) act as socket client, connect to HC-25 WiFi Module.

Image
Last post show my first test HC-25 WiFi Module, with AT Command; act as AP, setup socket server . Here is my exercise using Xiao ESP32C3 (in arduino-esp32 framework) to implement the client side: act as STA, join HC-25 WiFi network, connect to HC-25 socket server, receive and echo back in upper case. Exercise code: XiaoESP32C3_TCPclient.ino /* A simple TCP client run on ESP32-C3, * connect socket server run on HC-25 as AP. * * Have to set WAP in HC-25 using AT command: * AT+WMODE=AP * AT+WAP=myHC-25,password * * 192.168.4.1:8080 is the socket server on HC-25 */ #include <WiFi.h> // AP of HC-25 const char *ssid = "myHC-25"; const char *password = "password"; // server IP and port const IPAddress serverIP(192,168,4,1); uint16_t serverPort = 8080; WiFiClient client; void setup() { delay(200); Serial.begin(115200); delay(200); Serial.println("\n\r- Socket Client run on Xiao ESP32C3 (arduino-esp32) -"); Serial.printl...

HC-25 WiFi Module

Image
HC-25 WiFi IoT module supports TCP, UDP, HTTP, MQTT ~ Product Page : include various information about HC-25 WiFi Module include Specification, AT Command Set, and various Utilities (currently in Chinese) First test HC-25 WiFi Module, with AT Command, as Socket Server: Once setup as in the video, the HC-25 act as AP (with ssid/password = "myHC-25"/"password", and setup socket server at 192.168.4.1:8080. Following are exercises to implement client side in various platform to connect to the HC-25 socket server: ~  Xiao ESP32C3 (in arduino-esp32 framework) act as socket client, connect to HC-25 WiFi Module . ~ Raspberry Pi Pico W/MicroPython act as socket client, connect to HC-25 WiFi Module . ~ ESP32-S3/CircuitPython act as socket client, connect to HC-25 WiFi Module .

80x160 ST7735S SPI TFT with Raspberry Pi Pico W/CircuitPython 8 Beta 5

Image
Display on 0.96" 80x160 (RGB) IPS with ST7735S SPI Driver with Raspberry Pi Pico W/CircuitPython 8.0.0 Beta 5 Prepare Libraries: Visit https://circuitpython.org/libraries , download and extract Bundle for Version 8.x matching with your CircuitPython version. Libraries need: adafruit_display_shapes folder adafruit_display_text folder adafruit_st7735r.mpy adafruit_ticks.mpy Copy to CircuitPython device's /lib  Connection: ST7735 Raspberry Pi Pico W --------------------------- BLK 3V3 CS GP15 DC GP14 RES GP13 SDA GP11 SCL GP10 VCC 3V3 GND GND Exercise Code: cpyPicoW_st7735r_simpletest.py modified from example st7735r_simpletest.py """ Copy from CircuitPython Lib example st7735r_simpletest.py """ # SPDX-FileCopyrightText: 2021 ladyada for Adafruit Industries # SPDX-License-Identifier: MIT """ This test will initialize the display using displayio and draw a solid green background, a smaller...

0.96" 80x160 (RGB) IPS with ST7735S SPI Driver

Image
0.96" 80x160 (RGB) IPS with ST7735S SPI Driver ~ Product page Exercise: ~  80x160 ST7735S SPI TFT with Raspberry Pi Pico W/CircuitPython 8 Beta 5 ~  Raspberry Pi Pico W/MicroPython x 0.96" 80x160 ST7735 SPI IPS

CircuitPython 8.0.0 Beta 5 released with one-line status bar

Image
CircuitPython 8.0.0 Beta 5 released .  A one-line status bar added to displays connection status, last exception, and version on a terminal window title or on the top line of an attached display. It need Mu 1.2.0 or Thonny 4.0.x and later to suppress status bar information in the REPL output. Currently on Linux Mint 21, the Thonny available to be installed with apt is ver 3.3.14, not the most update 4.0.1. Refer last post " Install Thonny 4.0.1 on Linux Mint 21 ". Raspberry Pi Pico W with CircuitPython 8.0.0 Beta 5, work with Thonny 4.0.1. Work on Raspberry Pi Pico with CircuitPython 8.0.0 Beta 5, one-line status bar added on top of attached display ST7789.

Install Thonny 4.0.1 on Linux Mint 21

Image
Currently, the Thonny available to be installed with apt is ver 3.3.14, not the most update 4.0.1. To install Thonny 4.0.1 Visit Thonny page: https://thonny.org/ For Linux, download "thonny-4.0.1.bash", and make it runnable as program. Run in Terminal $ ./thonny-4.0.1.bash