Posts

Showing posts from 2023

Raspberry Pi Pico W (Arduino Framework) display on 0.85 inch 128x128 LCD with GC9107 SPI driver, using GFX Library for Arduino (Arduino_GFX).

Image
Below video show steps to to display on Waveshare 0.85 inch 128x128 LCD with GC9107 SPI driver  with  Raspberry Pi Pico W . It should work on Raspberry Pi Pico and  WeAct RP2040 Dev. Board . GFX Library for Arduino (Arduino_GFX) is needed, make sure it's installed in Library Manager. To use Arduino_GFX on Raspberry Pi Pico (or RP2040), we have to use board of Raspberry Pi Pico/RP2040 by Earle F. Philhower III) . Read the post former post to Install Earle Philhower Raspberry Pi Pico Arduino core on Arduino IDE . It will not work on board Raspberry Pi Pico from Arduino Mbed OS RP2040 Boards by Arduino . In the video, it's tested with Arduino_GFX examples. Examples > GFX Library for Arduino > HelloWorld Examples > GFX Library for Arduino > Clock Examples > GFX Library for Arduino > WiFiAnalyzer > PicoWiFiAnalyzer And finally tested using PDQgraphicstest to compare Arduino_HWSPI() a...

Python/PyQt5 GUI to control Raspberry Pi Camera using picamera2 lib

Image
Previous post show a simple example of  Using the Raspberry Pi Camera in Python3/PyQt5 applications using picamera2 lib , here is another exercise with more. The video show the Python/PyQt5 run on Raspberry Pi 5 with dual camera, Camera Module 3 & HQ Camera with 6mm 3MP lens . The Raspberry Pi 5 is running 64-bit Raspberry Pi OS (bookworm). Note that if picam2 = Picamera(0) to use HQ Camera, the code will report RuntimeError: Control AfMode is not advertised by libcamera . Because HQ Camera have no Auto-Focus function. picam2_qt5_2023-12-28.py """ Python 3/PyQt5 + picamera2 to control Raspberry Pi Camera Modules Tested on Raspberry Pi 5/64-bit Raspberry Pi OS (bookworm) # in my setup: # Picamera2(0) - HQ Camera # Picamera2(1) - Camera Module 3 """ import sys, platform, os from PyQt5.QtWidgets import QMainWindow, QApplication, QPushButton, QLabel, QWidget, QTabWidget, QVBoxLayout, QGridLayout from PyQt5.QtGui import QIcon fr...

my display module - 0.85inch LCD Module (128x128 GC9107 SPI) by Waveshare

Image
0.85inch LCD Module (128x128 GC9107 SPI) by Waveshare Product page: ~  0.85inch LCD Module - Waveshare Wiki Exercise: ~  Raspberry Pi Pico W (Arduino Framework) display on 0.85 inch 128x128 LCD with GC9107 SPI driver . ~  ESP32-S3-Zero display on 0.85 inch 128x128 LCD with GC9107 SPI driver, using Arduino_GFX .

PyQt5 QTabWidget exercise

Image
py_qt5_tab.py , a simple exercise of using PyQt5 QTabWidget. """ PyQt5 exercise of QTabWidget """ import sys, platform, os from PyQt5.QtWidgets import (QMainWindow, QApplication, QPushButton, QLabel, QWidget, QTabWidget, QVBoxLayout, QGridLayout) from PyQt5.QtCore import pyqtSlot, Qt from PyQt5.QtGui import QPalette, QColor, QFont class App(QMainWindow): def __init__(self): super().__init__() self.title = __file__ self.left = 0 self.top = 0 self.setWindowTitle(self.title) self.main_widget = MyMainWidget(self) self.setCentralWidget(self.main_widget) self.show() class MyMainWidget(QWidget): def read_f(self, file): with open(file, encoding='UTF-8') as reader: content = reader.read() return content def read_pretty_name(self): with open("/etc/os-release") as f: os_release =...

Get OS pretty name using Python, Raspberry Pi OS

Image
Python 3 exercise run on Raspberry Pi 5 running 64-bit Raspberry Pi OS (bookworm) to read OS pretty name (such as Debian GNU/Linux 12 (bookworm) ) by reading and parsing the file "/etc/os-release". pretty_name.py with open("/etc/os-release") as f: os_release = {} for line in f: k,v = line.rstrip().split("=") os_release[k] = v.strip('"') for keys, values in os_release.items(): print(keys, ":", values) print() pretty_name = os_release['PRETTY_NAME'] print("PRETTY_NAME:", pretty_name) Output: PRETTY_NAME : Debian GNU/Linux 12 (bookworm) NAME : Debian GNU/Linux VERSION_ID : 12 VERSION : 12 (bookworm) VERSION_CODENAME : bookworm ID : debian HOME_URL : https://www.debian.org/ SUPPORT_URL : https://www.debian.org/support BUG_REPORT_URL : https://bugs.debian.org/ PRETTY_NAME: Debian GNU/Linux 12 (bookworm)

Using the Raspberry Pi Camera in Python3/PyQt5 applications using picamera2 lib

Image
Exercise to use the Raspberry Pi Camera in Python3/PyQt5 applications using picamera2 lib, with modification to make the preview match with captured images and enable Auto-Focus in Continuous. Tested on Raspberry Pi 5 running 64-bit Raspberry Pi OS (bookworm) with Camera Module 3. Please notice that currently only the Camera Module 3 provide Auto-Focus feature. Firstly, Copy from the example in The Raspberry Pi official manual The Picamera2 Library (2023-11-27) Charpter 8.5 Using the camera in Qt applications, named Qt_Picamera2_App.py. Qt_Picamera2_App.py listed here for reference. """ Copy from the example in The Raspberry Pi official manual The Picamera2 Library (2023-11-27) Charpter 8.5 Using the camera in Qt applications """ from PyQt5 import QtWidgets from PyQt5.QtWidgets import QPushButton, QVBoxLayout, QApplication, QWidget from picamera2.previews.qt import QGlPicamera2 from picamera2 import Picamera2 picam2 = Pic...

Python code to get MAC address using uuid.getnode()

Image
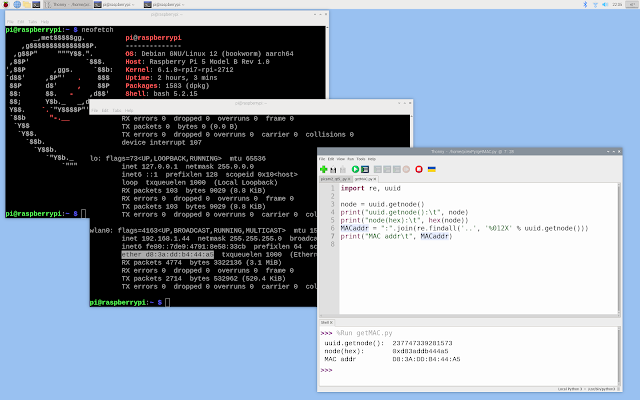
getMAC.py, Python code to get MAC address using uuid.getnode() . import re, uuid node = uuid.getnode() print("uuid.getnode():\t", node) print("node(hex):\t", hex(node)) MACaddr = ":".join(re.findall('..', '%012X' % uuid.getnode())) print("MAC addr\t", MACaddr) Run on Raspberry Pi 5/Raspberry Pi OS 64-bit (bookworm).

Turtle Graphics on ESP32-S3-EYE/CircuitPython

Image
In Python, turtle graphics provides a representation of a physical “turtle” (a little robot with a pen) that draws on a sheet of paper on the floor. It’s an effective and well-proven way for learners to encounter programming concepts and interaction with software, as it provides instant, visible feedback. It also provides convenient access to graphical output in general. py_turtle.py is a Python 3 script run on desktop to draw Rotated Squares using Turtle Graphics. (code copied from https://deborahrfowler.com/MathForVSFX/RotatedSquares.html ) # Turtle Exercise run on Desktop/Python 3 import turtle print("Turtle Exercise run on Desktop/Python 3") def drawSquare(t,size,angle): t.left(angle) halfsize = size * .5 t.pu() t.setpos(0,0) t.backward(halfsize) t.left(90) t.backward(halfsize) t.right(90) t.pd() for i in range(0,4): t.fd(size) t.left(90) def drawSquarePattern(t): t.color("bl...

Setup Auto-mount Shared Folder in VirtualBox between Windows 11 Host OS and Linux Guest OS

Image
This video show steps to setup Auto-mount Shared Folder in VirtualBox between Windows 11 Host OS and Linux Guest OS To set up Shared Folder in VirtualBox, make sure Guest Additions is installed . In VirtualBox control panel: Select target guest OS (Linux Mint) and click Settings. Select Shared Folders tab and click on "+" sign to add new shared folder. Select folder to share, Enable Auto-mount, click OK to finish setup. Start the guest OS (linux Mint). Try to access the shared folder in guest OS, but failed due to Permission denied. The shared folder belong to vboxsf group. To grant permission to user to access the shared folder, add user to vboxsf group: sudo usermod -G vboxsf -a <user> Log out and log in. Now you can access from both host Windows 11 and guest Linux.

HiSpark Hi3861 WiFi IoT Development Board

Image
Hi3861 Development Board is one of the typical development boards recommended for  getting started with OpenHarmony device development .

Install PlatformIO on Visual Studio Code to program ESP32-C6 in ESP-IDF.

Image
It's a fresh new Linux Mint with Visual Studio Code installed , no esptool or ESP-IDF installed. This video show steps to install PlatformIO on Visual Studio Code, to program YD-ESP32-C6-N16 . It's quite straightforward, except that: If following error reported while installing: PlatformIO: can not find working Python 3.6+ Interpreter. Click on Abort PlatformIO IDE Installation, and check available solutions: https://github.com/platformio/platformio-core-installer/issues/1774 Solution for Linux, install the following package and restart IDE. sudo apt-get install python3-venv If fail in accessing USB port: A fatal error occurred: Could not open /dev/ttyUSB0, the port doesn't exist. Grant permission to user, enter the command in Terminal, log out and log in: sudo usermod -a -G dialout <user> Code: Edit platformio.ini to add the last three line about monitor_ setting: [env:esp32-c6-devkitc-1] platform = espressif32 board = esp32-c6-devkitc-1 framewo...

Create Hello World in VSCode/ESP-IDF Extension manually, run on ESP32-C6 to send text to Serial.

Image
With ESP-IDF Extension installed on VSCode , this video show how to create Hello World in VSCode/ESP-IDF Extension manually, run on  YD-ESP32-C6-N16 to send text to Serial. Create new ESP-IDF project: > View > Command Palette > ESP-IDF: New Project Setup new project hello-C6, choose ESP-IDF Board: ESP32-C6 chip (via ESP USB Bridge) Edit and rename main.c to main.cpp : #include <iostream> extern "C" void app_main(void) { for (int i=0; i<=20; i++){ std::cout << "Hello World! "; std::cout << i; std::cout << "\n"; } } Build, Flash and Run: > View > Command Palette > ESP-IDF: Build, Flash and start a monitor on your device

Python/Raspberry Pi to read model name

Image
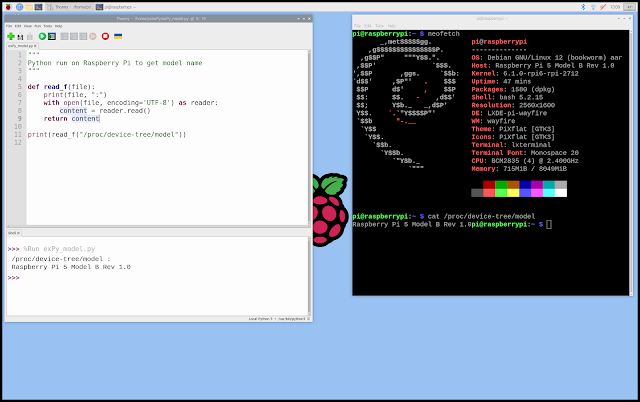
Python code run on Raspberry Pi to get model name, by reading /proc/device-tree/model. exPy_model.py """ Python run on Raspberry Pi to get model name """ def read_f(file): print(file, ":") with open(file, encoding='UTF-8') as reader: content = reader.read() return content print(read_f("/proc/device-tree/model")) Output run on Raspberry Pi 5/8G running Raspberry Pi OS 64-bit (bookworm) . /proc/device-tree/model : Raspberry Pi 5 Model B Rev 1.0

Python run on Raspberry Pi OS to check memory and disk info using psutil.

Image
psutil (python system and process utilities) is a cross-platform library for retrieving information on running processes and system utilization (CPU, memory, disks, network, sensors) in Python. It is useful mainly for system monitoring, profiling, limiting process resources and the management of running processes. It's a simple Python exercise run on Raspberry Pi 5/8G running Raspberry Pi OS 64-bit (bookworm), to check memory and disk info using psutil. psutil_info.py import psutil #https://psutil.readthedocs.io/en/latest/index.html memory = psutil.virtual_memory() memory_available = round(memory.available/(1024*1024)) memory_total = round(memory.total/(1024*1024)) # Calculate disk information disk = psutil.disk_usage('/') disk_used = round(disk.used/(1024*1024*1024)) disk_total = round(disk.total/(1024*1024*1024)) print(psutil.__name__, psutil.__version__) print() print("Memory:\t", str(memory_available), "MB available ...

Python/picamera2 to read camera properties

Image
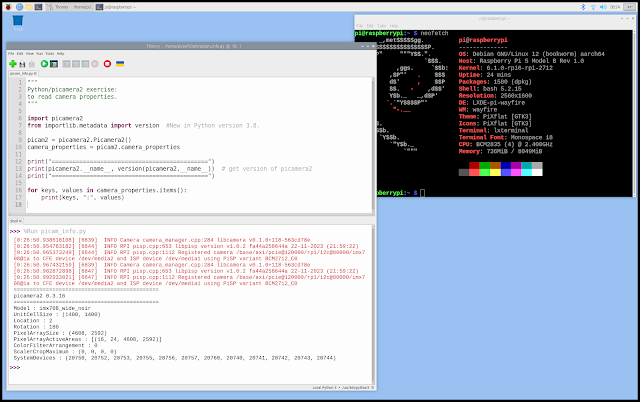
Python/picamera2 to read camera properties. picam_info.py """ Python/picamera2 exercise: to read camera properties. """ import picamera2 from importlib.metadata import version #New in Python version 3.8. picam2 = picamera2.Picamera2() camera_properties = picam2.camera_properties print("=============================================") print(picamera2.__name__, version(picamera2.__name__)) # get version of picamera2 print("=============================================") for keys, values in camera_properties.items(): print(keys, ":", values) Output run on Raspberry Pi 5/8G & Camera Module 3 Wide NoIR : ============================================= picamera2 0.3.16 ============================================= Model : imx708_wide_noir UnitCellSize : (1400, 1400) Location : 2 Rotation : 180 PixelArraySize : (4608, 2592) PixelArrayActiveAreas : [(16, 24, 4608, 2592)] ColorFilterArrangement : 0 ScalerCropMaximum : ...

YD-ESP32-S3-EYE/CircuitPython 8, control LCD and Camera.

Image
With CircuitPython 8.2.8 installed on YD-ESP32-S3-EYE ,  Here are exercises to access LCD and camera on YD-ESP32-S3-EYE . Exercise to test LCD/Color on LCD, cpyS3EYE_LCD_color.py . """ LCD/Color test on YD-ESP32-S3-EYE/CircuitPython 8.2.8 """ import os, sys import board import time import displayio import terminalio from adafruit_display_text import label display = board.DISPLAY #======================================= info = os.uname()[4] + "\n" + \ sys.implementation[0] + " " + os.uname()[3] + "\n" + \ "board.DISPLAY: " + str(display.width) + "x" + str(display.height) print("=======================================") print(info) print("=======================================") print() # Make the display context bgGroup = displayio.Group() display.show(bgGroup) bg_bitmap = displayio.Bitmap(display.width, display.height, 1) # with one color bg_palette = displayio.Palett...

My Raspberry Pi 5/8G and Camera Modules

Image
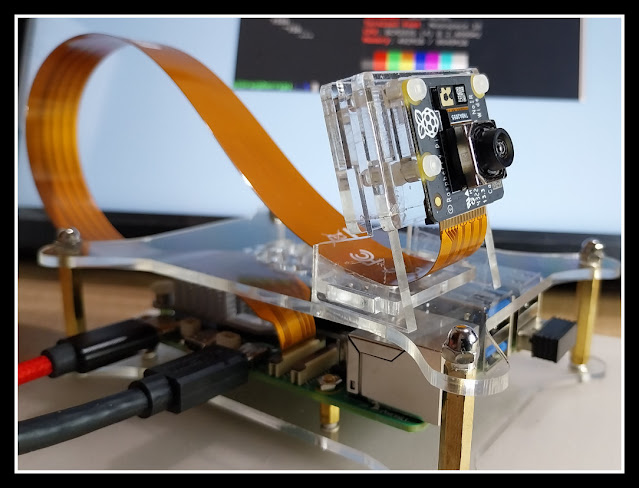
My Raspberry Pi 5/8G & Camera Module 3 Wide NoIR Raspberry Pi 5 with dual camera, Camera Module 3 & HQ Camera. Official document: ~ The Picamera2 Library (picamera2-manual.pdf) updated at 2023-11-27. ~ Raspberry Pi Camera Algorithm and Tuning Guide (raspberry-pi-camera-guide.pdf) updated at 2023-11-27. Python code to read sys info: ~ check memory and disk info using psutil ~ read model name ~ Python code to check if Raspberry OS are Running in 32-bit or 64-bit Exercises run on Raspberry Pi 5 running 64-bit Raspberry Pi OS (bookworm) with Camera Module 3: ~ Python/picamera2 to read camera properties ~  Using the Raspberry Pi Camera in Python3/PyQt5 applications using picamera2 lib ~  Python/PyQt5 GUI to control Raspberry Pi Camera using picamera2 lib , with Camera Module 3/HQ Camera. ~  Python/PyQt5/Picamera2 to control Raspberry Pi Cameras with GUI, with camera_controls . ~  Python/PyQt5/Picamera2 to cont...

Install CircuitPython firmware on YD-ESP32-S3-EYE using esptool

Image
Install CircuitPython 8.2.8 firmware on YD-ESP32-S3-EYE by VCC-GND Studio using esptool, run on Linux Mint 21.2, over Windows 11/VirtualBox. Power up in BOOTLOADER mode: - Press and hold BOOT button, connect USB. Visit CircuitPython Download Page , search and download for ESP32-S3-EYE. Download .BIN of CircuitPython 8. Check CHIP/FLASH ID: esptool.py --chip auto --port <PORT> chip_id esptool.py --chip auto --port <PORT> flash_id Erase Flash:: esptool.py --chip esp32s3 --port <PORT> erase_flash Flash Firmware in .BIN: esptool.py --chip esp32s3 --port <PORT> --baud 460800 write_flash -z 0x0 <.BIN> Disconnect and connect USB again. It will run in CircuitPython. Exercises of CircuitPython run on YD-ESP32-S3-EYE: ~  YD-ESP32-S3-EYE/CircuitPython 8, control LCD and Camera .

Flash CircuitPython 9 (Alpha 5) on ESP32-C6, and control on-board RGB LED (NeoPixel).

Image
Flash CircuitPython 9.0.0-alpha.5 on YD-ESP32-C6-N16 , and control on-board RGB LED (NeoPixel). Run on Windows 11. esptool is needed to flash firmware on ESP-C6, read  Install esptool on Windows 11 . Steps to flash CircuitPython firmware on ESP32-C6: Visit https://circuitpython.org/downloads , search boards of ESP32-C6. There are no 16MB Flash version, so I try "ESP32-C6-DevKitC-1-N8". Download .bin of CircuitPython 9.0.0-alpha.5 now. Connect to USB connector marked "COM". Erase Flash with command: esptool --chip esp32c6 --port <COM> erase_flash Write Binary Data to Flash with command: esptool --chip esp32c6 --port <COM> write_flash 0x0 <.bin> Reconect USB to connector marked "USB". Open Thonny Python IDE. In Thonny: > Run > Configure interpreter... Select interpreter of "CircuitPython (generic)" and Port, then OK. Prepare lib for neopixel: Visit https://circuitpython.org/libr...

Raspberry Pi Pico/TFT_eSPI display on 3.5" 480 x 320 ILI9488 SPI TFT

Image
This video show  Raspberry Pi Pico (RP2040) using TFT_eSPI library display on 3.5" 480 x 320 ILI9488 SPI TFT , in Arduino Framework. Install TFT_eSPI in Arduino IDE's Library Manager. It's strongly suggested to visit TFT_eSPI page , scroll down to Tips section. If you load a new copy of TFT_eSPI then it will overwrite your setups if they are kept within the TFT_eSPI folder. One way around this is to create a new folder in your Arduino library folder called "TFT_eSPI_Setups". You then place your custom setup.h files in there. After an upgrade simply edit the User_Setup_Select.h file to point to your custom setup file. To locate Arduino library folder: > File > Preferences... Copy the path inside Sketchbook location. Open file explorer to open Sketchbook location, to locate Arduino library folder. Create a new folder in your Arduino library folder called "TFT_eSPI_Setups". Copy the file /TFT_eSPI/User_Se...

Check if I belongs to dialout group (Linux command)

Image
Tested on Linux Mint 21.2, to check if I belongs to any group, Linux command id and groups can be used. id: Print user and group information for each specified USER, or (when USER omitted) for the current user. id id <user> groups: Print group memberships for each USERNAME or, if no USERNAME is specified, for the current process (which may differ if the groups database has changed). groups groups <user>

Display on 320x480 ILI9488 SPI TFT with Nano 33 BLE nRF52840 using Arduino_GFX Library (Arduino framework)

Image
This video show steps to display on 3.5" 320x480 ILI9488 SPI TFT with Nologo Nano 33 BLE nRF52840 using Arduino_GFX Library (Arduino framework). Makesure "GFX Library for Arduino" is installed in Arduino IDE Library Manager. Open Examples > GFX Library for Arduino > HelloWorldGfxfont Replace the code of Arduino_GFX setting, /******************************************************************************* * Start of Arduino_GFX setting ******************************************************************************/ #include <Arduino_GFX_Library.h> #define TFT_CS D10 #define TFT_RESET D9 #define TFT_DC D8 #define TFT_MOSI D11 #define TFT_SCK D13 #define TFT_LED D7 #define TFT_MISO -1 // not used for TFT #define GFX_BL TFT_LED // backlight pin /* More data bus class: https://github.com/moononournation/Arduino_GFX/wiki/Data-Bus-Class */ Arduino_DataBus *bus = new Arduino_HWSPI(TFT_DC, TFT_CS); /* More display c...

Install Espressif IDF Extension in VS Code to program ESP32-C3 Run on Linux Mint 21.2 (over Windows 11/VirtualBox)

Image
This video show steps to install Espressif IDF Extension in VS Code to program Espressif ESP32-C3-DevKitM-1 . Here VS Code run on Linux Mint 21.2 (over Windows 11/VirtualBox) . Basically, it follow the steps in  ESP-IDF Visual Studio Code Extension Installation Guide to - Install ESP-IDF Extension to VS Code. - Install Prerequisites for Linux . - Configure ESP-IDF extension. - Add 60-openocd.rules for permisssion delegation in USB to added in /etc/udev/rules.d/. Then follow Basic use of the extension to: - Create project of Blink example. - Grant permission to user to access USB port. - finally flash on ESP32-C3-DevKitM-1. Fix IntelliSense error of: identifier "CONFIG_BLINK_PERIOD" is undefined identifier "portTICK_PERIOD_MS" is undefined in VS Code/ESP-IDF Blink Example. With auto-generated code with default setting, it can be built, flash and run on ESP32-C3 device without error. Is it OK, ...NOT. ...

Install Visual Studio Code on Linux Mint 21.2 (over VirtualBox/Windows 11)

Image
 Install Visual Studio Code1.81 on Linux Mint 21.2, over VirtualBox/Windows 11. Visit: https://code.visualstudio.com/ Download .deb for x64 It's two ways listed to install VS Code in Linux (.deb) Method one: sudo apt install ./<file>.deb It's first suggested, but in my test on Linux Mint 21.2, it reports error of Permission denied: N: Download is performed unsandboxed as root as file '/home/eric/Downloads/code_1.83.1-1696982868_amd64.deb' couldn't be accessed by user '_apt'. - pkgAcquire::Run (13: Permission denied) Method two: sudo dpkg -i <file>.deb sudo apt-get install -f # Install dependencies For older Linux distribution, works for me with no error. next: ~  Install Espressif IDF Extension in VS Code to program ESP32-C3 Run on Linux Mint 21.2 (over Windows 11/VirtualBox) . ~  Create Hello World in VSCode/ESP-IDF Extension manually, run on ESP32-C6 to send text to Serial . ~  Install PlatformIO on Visua...