Posts

Showing posts from May, 2023

Keep your Windows 11 healthy by running cleanmgr, %temp% and mrt

Image
Type Win + r to run the following command to Keep your Windows 11 healthy: cleanmgr : Disk cleanup %temp% : Open temp folder, such that you can delete unnecesary files. mrt : Windows Malicious Software Removal Tool

128x160 TFT/ST7735 SPI wih EP32C3 (arduino-esp32) using Arduino_GFX Library

Image
Previous post show 3.5 inch 480x320 TFT/ILI9488 SPI wih EP32C3 (arduino-esp32) using Arduino_GFX Library , here is how it display on 1.8 inch 128x160 ST7735 SPI TFT . Both the 3.5 inch 480x320 ILI9488 SPI TFT and 1.8 inch 128x160 ST7735 SPI TFT have the same pins assignment on TFT part, keep the connection keep no change. Code: c3_st7735_test.ino , for color and resolution test. /******************************************************************************* * Exercise of Arduino_GFX, color testing. * Run on Xiao ESP32C3 + 1.8 inch 128x160 ST7735 SPI TFT ******************************************************************************/ #include <Arduino_GFX_Library.h> #define TFT_CS 5 //GPIO5 #define TFT_RESET 3 //GPIO3 #define TFT_DC 4 //GPIO4 #define TFT_MOSI 10 //GPIO10/MOSI #define TFT_SCK 8 //GPIO8/SCK #define TFT_LED 2 //GPIO2 #define TFT_MISO -1 // not used for TFT #define GFX_BL TFT_LED // backlight pin /* More data bus cl...
Enter special character and emoji in Windows 11

Image
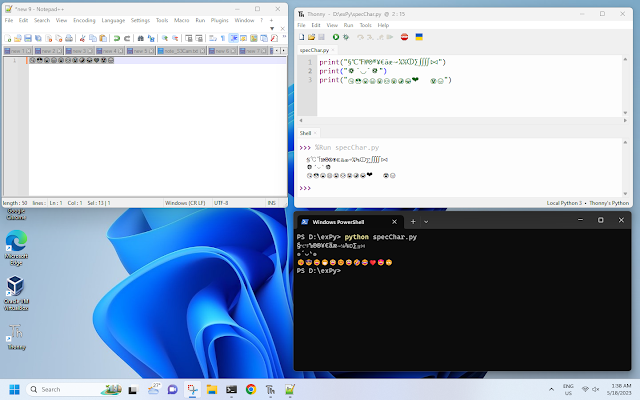
 😋😎😄😁😀😊😃🤣😂❤️😍😒 To demonstrate, Windows On-Screen Keyboard is used to enter the hot-keys. To open/close On-Screen Keyboard, type the keys combination: Win + Ctrl + O To enter special characters or emojis: - Open emoji keyboard panel : type: Win  + . (period)

480x320 TFT/ILI9488 SPI wih EP32C3 (arduino-esp32) using Arduino_GFX Library

Image
Display on 3.5 inch 480x320 TFT with SPI ILI9488 (SKU:MSP3520) with XIAO EP32C3 (arduino-esp32) using Arduino_GFX Library. Install GFX Library for Arduino (Arduino_GFX) in Library Manager. Arduino_GFX is a Arduino graphics library supporting various displays with various data bus interfaces. This library start rewrite from Adafruit_GFX, LovyanGFX, TFT_eSPI, Ucglib, and more... Connection:      Connection between XIAO ESP32C3 and      3.5" 480x320 TFT with SPI ILI9488 (SKU:MSP3520)      XIAO ESP32C3                        +-------------+           +---------|GPIO2    5V      |          | +-----|GPIO3    GND    |-----------+ | +-|-----|GPIO4    3V3    |---------+ | | | | +---|GPIO5    GPIO10|-----...

Locate pins_arduino.h in Arduino IDE 2/Windows 11

Image
In Arduino framework, pre-defined pins (such as LED_BUILTIN, SPI_MISO, I2C_SD... ) are defined in pins_arduino.h of corresponding installed board package. This video show how to locate pins_arduino.h of Arduino Nano RP2040 Connect in Arduino IDE 2/Windows 11. Arduino Nano RP2040 Connect as a example, pins_arduino.h is locaed at: C:\Users\<user>\AppData\Local\Arduino15\packages\arduino\hardware\mbed_rp2040\4.0.2\variants\RASPBERRY_PI_PICO\ Related: ~  Get info and pre-defined pins of Arduino Nano RP2040 Connect

Get info and pre-defined pins of Arduino Nano RP2040 Connect

Image
 Here is a simple code to get board info and pre-defined pins of Arduino Nano RP2040 Connect. rp2Connect_info.ino void setup() { delay(2000); Serial.begin(115200); delay(200); Serial.println("\n- Arduino Nano RP2040 Connect info -"); Serial.println("-------------------------------------"); Serial.println("BOARD_NAME:\t\t" + String(BOARD_NAME)); Serial.println("BOARD_VENDORID:\t\t" + String(BOARD_VENDORID, HEX)); Serial.println("BOARD_PRODUCTID:\t" + String(BOARD_PRODUCTID, HEX)); Serial.println(); Serial.println("LED_BUILTIN:\t" + String(LED_BUILTIN)); Serial.println(); Serial.println("SPI_MISO:\t" + String(SPI_MISO)); Serial.println("SPI_MOSI:\t" + String(SPI_MOSI)); Serial.println("SPI_SCK:\t" + String(SPI_SCK)); Serial.println(); Serial.println("I2C_SDA:\t" + String(I2C_SDA)); Serial.println("I2C_SCL:\t" + String(I2C_SCL)); Se...

my display module - 3.5inch 480x320 TFT with SPI ILI9488 (SKU:MSP3520)

Image
3.5inch 480x320 TFT with SPI ILI9488, with touch and SD card slot (SKU:MSP3520) ~ Product Page Exercises: ~  480x320 TFT/ILI9488 SPI wih EP32C3 (arduino-esp32) using Arduino_GFX Library ~  Display on 320x480 ILI9488 SPI TFT with Nano 33 BLE nRF52840 using Arduino_GFX Library (Arduino framework) ~  Raspberry Pi Pico/TFT_eSPI display on 3.5" 480 x 320 ILI9488 SPI TFT

CameraWebServe: ESP32-S3 (arduino-esp32) + OV5640 camera module

Image
ESP32 CameraWebServer (arduino-esp32 framework) run on NodeMCU ESP-S3-12K-Kit + Waveshare OV5640 Camera Board (B) 5 Megapixel (2592x1944) . Connection, define in camera_pins.h. Modified camera_pins.h //=== my pin asssignment ===== #define PWDN_GPIO_NUM 35 #define RESET_GPIO_NUM 8 #define XCLK_GPIO_NUM 40 #define SIOD_GPIO_NUM 42 #define SIOC_GPIO_NUM 1 #define Y9_GPIO_NUM 4 #define Y8_GPIO_NUM 16 #define Y7_GPIO_NUM 11 #define Y6_GPIO_NUM 15 #define Y5_GPIO_NUM 13 #define Y4_GPIO_NUM 37 #define Y3_GPIO_NUM 14 #define Y2_GPIO_NUM 36 #define VSYNC_GPIO_NUM 9 #define HREF_GPIO_NUM 41 #define PCLK_GPIO_NUM 3 //============================ Modified CameraWebServer.ino #include "esp_camera.h" #include <WiFi.h> // // WARNING!!! PSRAM IC required for UXGA resolution and high JPEG quality // Ensure ESP32 Wrover Module or other board with PSRAM ...

Enable/Disable TCP/IPv6 on Windows 11

Image
To enable/disable TCP/IPv6 on Windows 11: > Settings > Network & internet > Advanced network settings > More network adapter options Right click on the selected network adapter > Properties Enable/Disable Internet Protocol Version 6 (TCP/IPv6) here. > OK to confirm To check IPv6 address: Enter "ipconfig" in PowerShell, Command Prompt or Terminal. (By default, IPv6 is enabled in Windows 11.)

Read TMP102 with XIAO ESP32-C3 (Arduino Framework)

Image
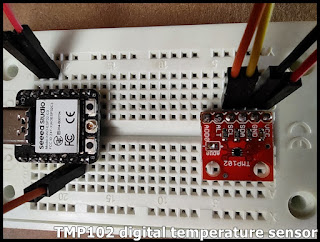
Read TMP102 with XIAO ESP32C3 (in Arduino Framework) using Temperature_LM75_Derived . Connection: TMP102 XIAO ESP32-C3 --------------------- VCC 3V3 GND GND SDA SDA/D4 SCL SCL/D5 Install I2C Temperature Sensors derived from the LM75. This library supports a large range of I²C temperature sensors based on the industry-standard LM75 package. Click on File > Examples > I2C Temperature Sensors derived from the LM75 > BasicUsage To run on ESP32C3, comment the line: while(!Serial) {} /* Read the temperature from an LM75-derived temperature sensor, and display it in Celcius every 250ms. Any LM75-derived temperature should work. */ #include <Temperature_LM75_Derived.h> // The Generic_LM75 class will provide 9-bit (±0.5°C) temperature for any // LM75-derived sensor. More specific classes may provide better resolution. Generic_LM75 temperature; void setup() { //while(!Serial) {} Serial.begin(9600); Wire.begin(); } void loop() { Serial...

Waveshare OV5640 Camera Board

Image
Waveshare OV5640 Camera Board (B) 5 Megapixel (2592x1944) Fisheye Lens ~ Product page remark: refer to  OV5640 Camera Board (B) Schematic , There are build-in pull-up resistors on SIO_CLK and SIO_DAT pins, so no extra resistors needed. related exercise: ~ CameraWebServe: ESP32-S3 (arduino-esp32) + OV5640 camera module